

Before and After: A Basic Bar Cart Makes Way for a Luxe Feature Wall for About $500
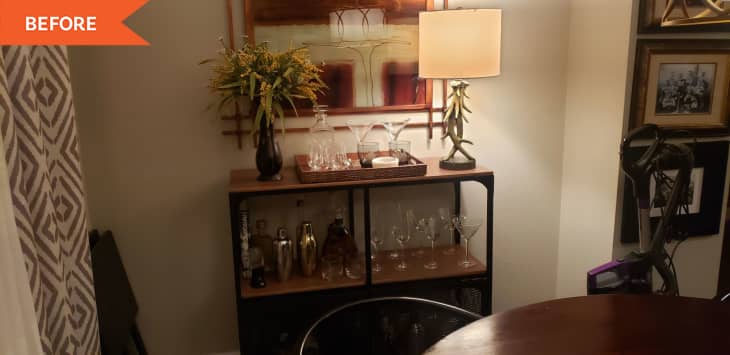

Bar carts are basically an apartment essential. They’re perfect for storing glassware andstylishly displayinggo-to cocktail and mocktail ingredients and supplies. They’re great for apartments because they’re oftencompactandportable. But if you have the space in a house to go all out with your bar setup, why not embrace something even bigger and bolder?
For more content like this follow
Apartment Therapy has seen some ultra-cool projects thatturn bar setups into feature walls, and this one from homeowner Susan Kunish is no exception. Thanks to paint, it looks built-in but is actually totally removable because it’s made from an IKEA IVAR setup neatly tucked into an existing alcove in Susan’s dining area.
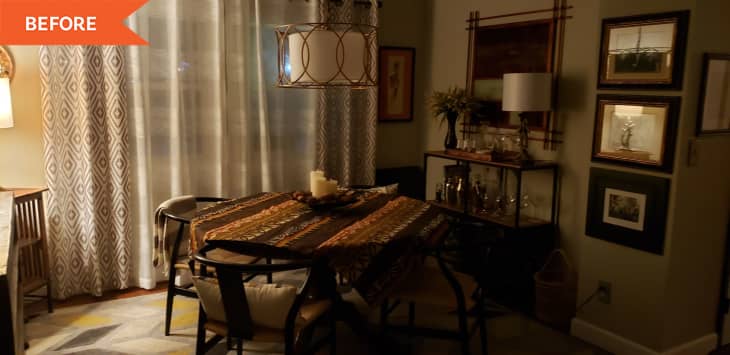
“This spot in my dining room is inset a bit,” Susan says of her dining room corner. “I wanted to add a banquette originally, but I like to have options on my dining table.”
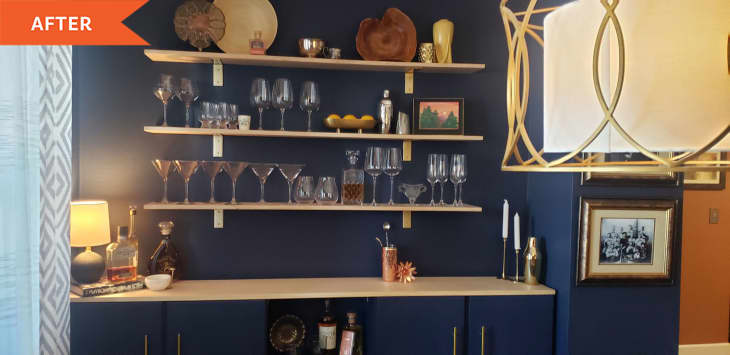
Wanting to keep her options flexible for her table shape and seating, she decided to add a bar made fromIKEA IVARsinstead. She painted them — and the other walls in the dining room — a midnight blue shade (Behr’s Starless Night) as she wanted to make the whole space a bit more dramatic.

Susan addedfeet from Amazonto the IVARS as well aselongating cabinet pullsfrom Etsy. The brass hardware gives the whole space a high-end, boutique look.
Above the cabinets, Susan bought wood for open shelving andbrackets from Amazonto hang them because she was looking for a way to show off her pretty barware.
“For styling, I actually had almost everything that is currently on the shelves, we just ‘shopped’ the house and put all the better wine glasses and liquor bottles on display,” Susan says. “I bought thebar tool setand theice bucketat Target, but those were the only items I did not already have.”

Susan’s advice for anyone looking to hang similar shelving is to consider what’s behind the wall where the shelves will go. In her home, it was a staircase, and the stud finder kept reading the stair risers behind the wall. In the future, it “might be helpful to measure it all out and see what is behind the wall before measuring and drilling to avoid patching,” she says.
“We wanted to try to get at least one side [of the shelving] in a stud, but it just would not center the right way, so we had to make a trip to home depot to get heavy duty molly bolts to use,” she explains.
And Susan’s advice for anyone who has to go the heavy duty bolt route? Don’t be dissuaded by the options at the hardware store; you can always paint them, like she did, to match her new brassy brackets.
Susan completed the project with the help of her husband and daughters, and it took them one weekend. “Me and my husband painted and primed everything first, ordered the legs and hardware and bought the wood for shelving and had it all ready to go when they came,” she says. With more hands and eyes, they were able to hang everything (and make sure it was level) more quickly.
The project, in total, cost about $500, she says.
Susan still plans to add copper cladding to the top of the bar, which will be the perfect finishing touch to her moody and metallic new setup. Cheers to that!
Inspired?Submit your own project here.